Migrate Volatility Plugins 2 to 3
The Volatility Foundation released Volatility 3 Public Beta, a new version of Volatility Framework in October 2019. The version not only offers compatibility with Python 3 but also has a lot of functional updates from Volatility 2. (Please see Volatility 3's official page for more details.) Particularly, creating plugins is much easier with Volatility 3 compared to the previous version.
Volatility 3’s official release is planned for August 2020, and the support for Volatility 2 will end in August 2021 [1]. With this change, the environment for Volatility plugin development will shift to Volatility 3. In addition, Volatility plugins that were developed for Volatility 2 will not run on Volatility 3, and so it is necessary to update such plugins.
In this entry, we will explain how to make a plugin for Volatility 2 work on Volatility 3. We will use the following Volatility plugin as an example.
JPCERTCC/impfuzzy GitHub - impfuzzy for Volatility
https://github.com/JPCERTCC/impfuzzy/tree/master/impfuzzy_for_Volatility/
The plugin updated for Volatility 3 is available here:
JPCERTCC/impfuzzy GitHub - impfuzzy for Volatility3
https://github.com/JPCERTCC/impfuzzy/tree/master/impfuzzy_for_Volatility3/
Points to consider in shifting to Volatility 3
There is a guidance on how to create a Volatility 3 plugin [2]. We recommend that developers go through it before creating or updating a plugin. To make a Volatility 2 plugin compatible with Volatility 3, it is important not only to make sure it works on Volatility 3 but also to consider the following differences between the two versions:
- Volatility plugin execution flow
- Class inheritance
- Options
- Symbol and Memory Layer
- Result output
The following sections will explain each component.
Volatility Plugin execution flow
In Volatility, once a plugin is loaded, a specific function in the plugin is executed. Figure 1 compares the functions executed when a plugin is called in Volatility 2 and 3.
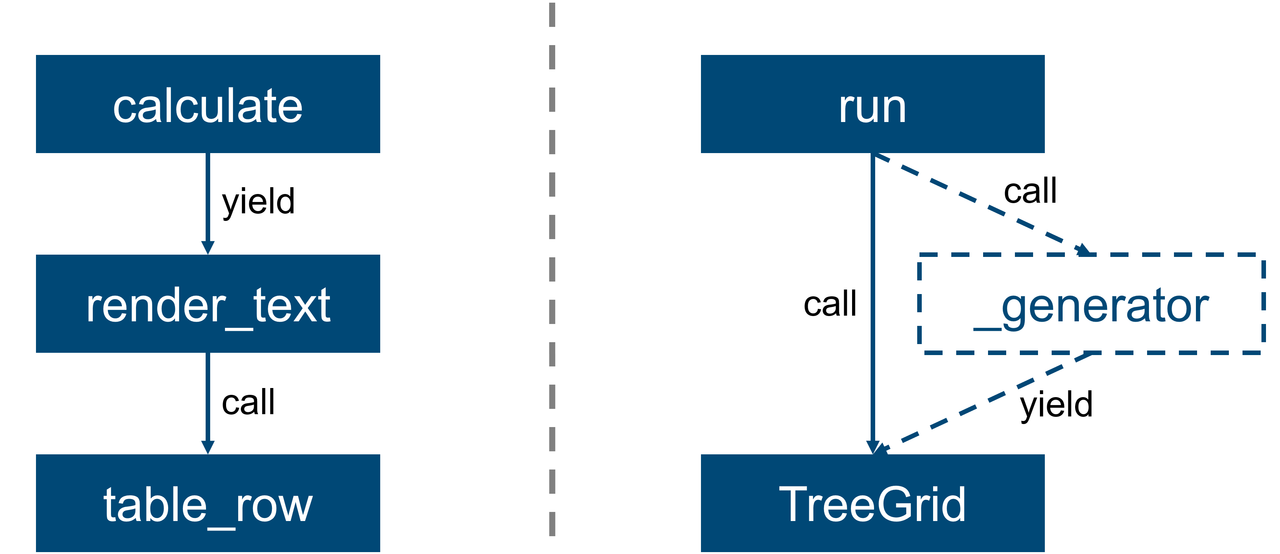
(Left: Volatility 2 / Right: Volatility 3)
In Volatility 2, the first function to be called is calculate(), and then render_text() is executed. It is a complicated structure; render_text() is not called by calculate(), but rather it is executed with a return value of calculate().
On the other hand, Volatility 3 has a simpler system. It executes run() first, and then TreeGrid() is called to output the result.
Class inheritance
A newly defined Volatility plugin basically inherits an existing class. In Volatility 2, plugin developers need to choose the appropriate classes from several existing ones according to their purpose of plugin.
From Volatility 3, a new class "interfaces.plugins.PluginInterface" has been defined with the aim of integrating the plugin interface. Now developers inherit this class to develop their plugins.

(Left: Volatility 2 / Right: Volatility 3)
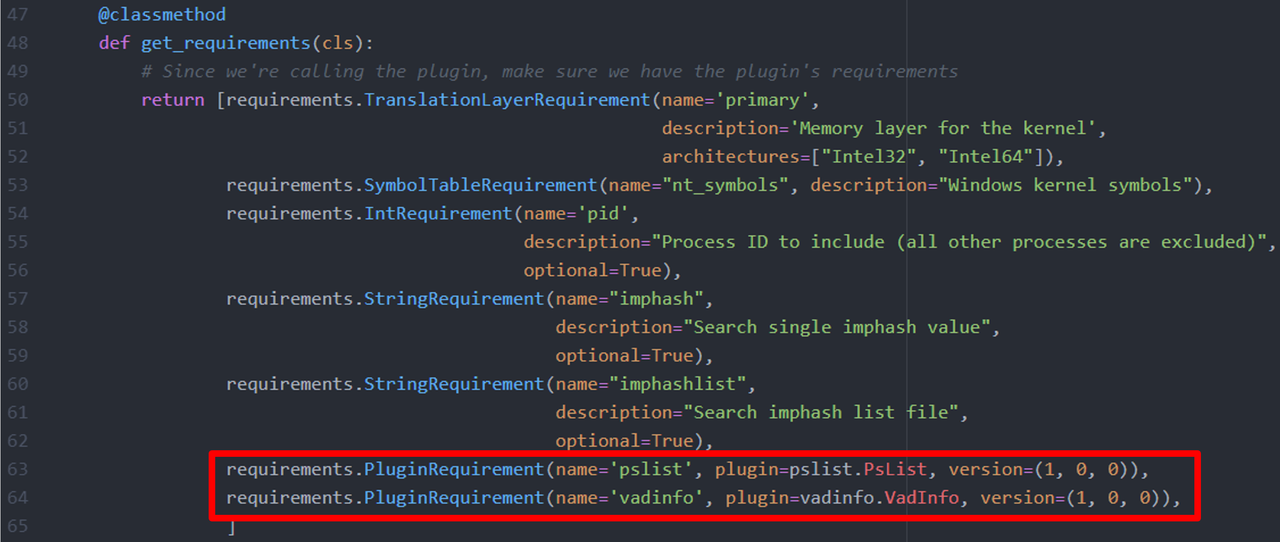
To access the existing plugin functions and data, import them by using the class method "requirements" as in Figure 3.
Options
Options to set upon Volatility plugin execution can be added to config with argparse (a Python module) in Volatility 2. In Volatility 3, this can be done by the "requirements" function as in the previous section.
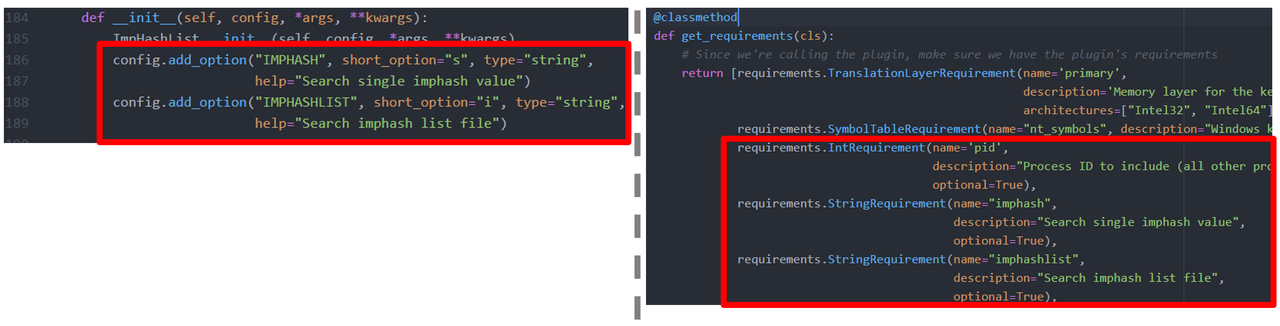
(Left: Volatility 2 / Right: Volatility 3)
In Volatility 3, short_option is no longer available. Also, while options are all inherited together with a class in Volatility 2, options need to be set in Volatility 3. For example, "pid", an option to specify process to analyse which works on many plugins, is not inherited, and rather needs to be written in the "requirements".
Symbol and Memory Layer
In Volatility 2, the OS information of the memory image to analyse has to be set with the profile option. This process is no longer necessary in Volatility 3, but instead it has to be set with the "requirements" function. (If it is Windows OS, use "nt_symbols" as in the Fig 5.)
Volatility 3 handle memory images by each "Memory Layer", and this needs to be defined in "requirements". Normally, one Memory Layer is sufficient, but multiple Memory Layers need to be defined when analysing multiple memory images. Memory architecture can also be set in Memory Layer, but this is optional.

Result output
Volatility plugin has functions to display results. These are table_header() and table_row() in Volatility 2, replaced by TreeGrid() in Volatility 3.

(Left: Volatility 2 / Right: Volatility 3)
With TreeGrid(), table size does not have to be set, but Type does. format_hints modules can be used for Hex and binary display. Result output of TreeGrid() can be exported in different formats such as CSV and JSON by using a command line option "renderer".
In closing
As the current Volatility 3 is a beta version, the features introduced in this article may change. Changing the settings should be done carefully as some default plugins that worked in Volatility 2 do not work in Volatility 3. Besides the points mentioned here, there are many other updated functions in Volatility 3, and so many settings may require changing when updating.
Compared to Volatility 2, Volatility 3 is a developer-friendly environment. If you have never created a Volatility plugin, it is worth trying now.
Shusei Tomonaga
(Translated by Yukako Uchida)
Reference
[1] Volatility Labs: Announcing the Volatility 3 Public Beta!
https://volatility-labs.blogspot.com/2019/10/announcing-volatility-3-public-beta.html
[2]Volatility Docs: How to Write a Simple Plugin
https://volatility3.readthedocs.io/en/latest/simple-plugin.html